skaarhoj-rawpanel
SKAARHOJ Raw Panel client
Made in cooperation with SKAARHOJ Aps
Quick Information
This module was created as an easy way to use a SKAARHOJ panel as a streamdeck and utilize buttons that you might not currently use on your controller, or maybe you want to have actual buttons instead of those on the Streamdeck.
The main requirement for this module to connect to a SKAARHOJ panel is to have the Unisketch core "Raw Panel" installed and run in server mode, but more info about this setup process can be found below.
Quick Notes:
- This is a client to the panel, so it need to be in "server mode" for this to work!
- "HWC" stands for "Hardware Component" on a SKAARHOJ panel, and you will see this ID in the WebUI for your controller. This is the unique identifier that all components have, be it a button, encoder, screen, led and so on.
Table of Content
- Quick Information
- Module Configuration
- IP and Port
- Enable Companion Satellite API v2.0
- Streamdeck Row's and Bank's
- Enable Auto Dim/Off for LED Feedbacks
- TCP Timeout
- Backup LED Refresh
- Enable Debug To Log Window
- Actions
- Feedbacks
- variables
- Presets
- SKAARHOJ Controller Setup
- Basic information
- Setup Unisketch Raw Panel
- Setup Unisketch Blue Pill Mode
- Setup Blue Pill Inside Panel
- Other Notes
Module Configuration
When you add this module to your setup, it will present a set of configuration settings and let's take a look at what those do:
1. IP and TCP port
These are for the connection to the panel. Please use the panels IP. This will most of the time be visible on one of the displays on the panel when nothing is connected to it.
The port is set by default to "9923", but you have the option to change it depending on what settings you have put on the actual panel, but "9923" is the default for Raw Panel.
For a very basic setup, this is all you need to configure, but you might want to use the Companion satellite API for the best experience.
2. Enable Companion Satellite API v2.0
This setting does exactly that. It enables the use of the Satellite API in the module. This is used together with the "Banks 1-32" options to create a "virtual" streamdeck on your SKAARHOJ controller, and you have the total freedom of what buttons from the streamdeck you want where. This even allows for pages and feedback, just like on a native streamdeck.
This will also register a "virtual" streamdeck pr module that has all the standard settings like you are use to with a streamdeck XL.
An example of a panel that has been registered:

And an example of the option for the panel:
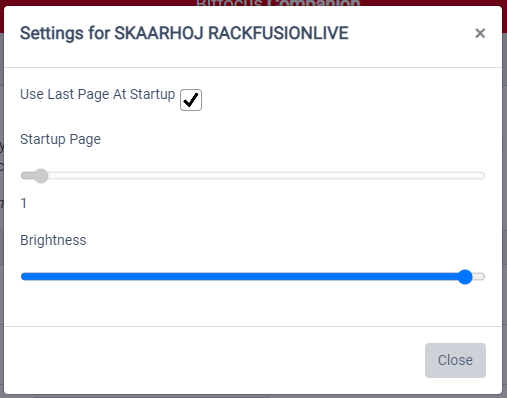
As shown, it will have the name of the Controller, as well as use the serial number for the device to ensure that you can use more than one of the same Controller type.
3. Streamdeck Row's and Bank's
These options allow you to specify what button/HWC on your panel you want to match with any button on a streamdeck XL, and it will then work just like that with page up and down colour feedback on the button as well as text support on the screen.
If you have a button that doesn't have a screen attached, you can map a separate screen on the panel to work together with any button. Use a comma to split the two entries in the text field.
When filling in your HWCs IDs. The Format: "button_HWC, Screen_HWC" -> "1,10" is used, and if there is only one number, the screen will be assumed to be on the same HWC
Shown in this picture is two different bank's one with a button that has a screen included, and on "bank 2", we have a button that uses a separate screen:

Encoders, joysticks and faders can also be mapped as a button in these fields. Just type in the HWC id for that component, but the use might be a bit limiting in some cases.
Quick Note: "HWC" stands for "Hardware Component" on a SKAARHOJ panel, and you will see this ID in the WebUI for your controller. This is the unique identifier that all components have, be it a button, encoder, screen, led and so on.
4. Enable Auto Dim/Off for LED Feedbacks
Note that changing this setting will require a restart of Companion in most cases.
If this is enabled, all HWC's with an LED will light a dim white when the button is black in Companion (mimics normal SKAARHOJ behaviour). Turn this off if you want them to turn completely off. (This would be more in line with how Companion does it usually)
This does not affect the "light up" effect that all 32 of these API buttons support. They will light up bright when pressed/latched and light dim or off when not pressed/latched. Just like you will see the yellow bar on the standard streamdeck displays.
5. TCP Timeout
Usually, just leave this on its default value "5000" or 5 seconds, but this is how often the module will ping the panel and provide the max time before a disconnect is discovered. This setting can be set in the range: "1000 -> 300000" or "1 sec -> 5 min"
6. Backup LED Refresh
Backup LED Refresh does just that. It controls how often we should send the data to the screens if nothing else has done that, so this helps eliminate a case where you would be stuck with a blank panel. But this also can affect the performance on the panel, so, therefore, it's set as default at "30000" or 30 seconds, but you can set it down to every 5 seconds. This might be prefered if you swap a lot around with pages on your controller.
Only really change this if you often end up with blank screens, and if that still happens, you can also use the action "refresh displays" on a button or trigger.
The total range for this option is: "5000 -> 600000" or "5 sec -> 10 min"
7. Enable Debug To Log Window
Requires Companion to be restarted. But this will allow you the see what is being sent from the module and what is being received from the panel. This can be usefull when debugging problems.
When you look at the log tab, you will see what Companion sends out to the panel as an "Info" log and what we get back from the panel as a "Warning".
Actions
In this module, there is a set of actions that you can use if you want to, but you might find that you don't need to as most of this module happens as feedbacks, so these are more for controlling the panel itself than actually controlling Companion from a panel.
- Set Button LED Status On/Off/Dimmed - Set the state of any LED, if set to off the color will be ignored
- Set Button LED Color - Set a custom LED Color on any LED
- Diplay Text on LCD - Send a custom string to show on a display
- Clear LED/Display/Both - Clears a specified HWC's LED, display or both
- Panel Brightness - Allows for setting panel brightness manually, but if you have the satellite API enabled, you can do this via the panel setting under "Surfaces".
- Webserver ON/OFF - Toggle the local webserver on and off on the SKAARHOJ panel
- Reboot Panel - Reboots the SKAARHOJ panel
- Custom Command - Send custom Raw Panel commands for full control over what to do, this also allows for controling other stuf like flags and memories on the controller
You can find more info about the "Raw Panel API" and what you can use as a custom command Here or via Direct Download
Feedbacks
Once again, just like with Actions, you might find that you don't need any of these feedbacks. Because if you use the Companion Satellite API, these are not needed for those 32 buttons.
But these feedbacks allows you to tie specific HWC's on your panel to a button on one particular page in Companion. This also allows you to map up to 254 different HWC's instead of just the 32 regular Streamdeck/Companion buttons laid out on the configuration page. Most of these can even be mapped to more that one button, like 4-Way buttons and encoders.
We would suggest using these feedbacks primarily for stuff you don't want to move around on your panel, so this could be for the "Start / Stop Streaming" button or similar that you would typically need to have on more than one page on the Streamdeck.
Feedbacks in this module is actually not a "feedback" in the normal Companion way, but instead, they are used here as a way to tie a SKAARHOJ HWC to a specific button. This is done this way because it's the only way for a module to know both what button it is as well as the state of the button if, say, you change the button's background colour or the text changes on the display.
So What "feedback's" does this module include:
A set of "feedbacks" that allows you to control this Companion button from your SKAARHOJ panel
- Generic - Tie HWC Press To This Button - Works as a generic version of the three feedbacks below.
- 4-Way/Edge Button - Tie HWC To This Button - Allows you to tie a Button or 4-Way Button to this Companion button and choose what edge to use. This will enable you to use one button to press 4 Companion buttons, depending on what edge was pressed.
- Encoder - Tie HWC To This Button - Allows you to tie an Encoder to a Companion button, but it also allows you to specify if it's when you press, rotate it left or right, so again you have the option to control three Companion buttons with just one SKAARHOJ encoder.
- Joystick - Tie HWC To This Button - Allows you to tie a joystick to a Companion button but also allows you to split up the directions so you can control multiple buttons with it, just like above.
And a set of "feedbacks" that allows you to tie the feedback to the SKAARHOJ panel's LED's and Screens.
- Tie HWC LED To This Button - Set's the LED on your Controller so it lights up in the same colour as on the Streamdeck Button's background. This includes colour changes from other feedbacks on the button.
- Tie HWC LCD/OLED to this Buttons Display - Sends the button text to the Controller whenever a change is detected. This included changes from other feedbacks on the button.
One thing these feedbacks will not do, is give you the status of latched companion buttons that is only supported on the 32 API buttons.
As some might have noticed, there is currently no "feedback" that allows you to tie a fader to a button, but all faders create a variable that can be used in modules that support it.
Variables
Variables are made in a dynamic fashion depending on what the controller connected has available. This means that if you connect a panel with a joystick, you will get an analogue variable for that HWC, and the same with faders and T-Bars.
All dynamic variables are made in the format: "HWC_id_type"
So as an example, here is a picture of the variables that are created when a Rack Fusion Live is connected to Companion via this module:
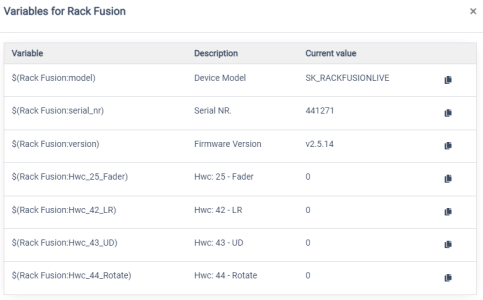
Other than the dynamic variables, it also has three static variables that get filled with info from the panel:
- Device Model
- Serial NR.
- Firmware Version
The serial number and device name are also what gets used when the panel gets added as a Satellite Device, so you will see this info under "Surfaces" as well.
Note that there will be no variable support with the current module version if used together with a "Blue Pill Inside" Controller.
Presets
Currently, there are no pre-made presets for this module, as it's normally used on top of buttons you already have defined, or that has actions from other modules on them already.
SKAARHOJ Controller Setup
So in order to use this module in any way or form, you will need to set up the Controller you want to use together with Companion, which can be done in a couple of ways depending on what type of Controller and what your use-case is.
1. Basic information
In short, there are three different control modes that have some different drawbacks and usabilities.
Unisketch Raw Panel: The normal way and most flexible way to use this module on Unisketch are via the "Raw Panel" core that you install in the Controllers firmware via the "Firmware Updater".
This gives you a set of positives:
- It can be used together with other device cores.
- Can be limited to only part of the pane or the whole panel, on the individual pre HWC level
- Can use DHCP or static ip
And negatives:
- Requires firmware flash to be installed
Unisketch Blue Pill Mode: The second way to connect a Unisketch panel is via the "Blue Pill Mode" that has been introduced in all Unisketch firmware since late 2021, but you might not have seen or used it yet, as this is normally only used together with a SKAARHOJ Blue Pill. But this mode can also be used with this module as it uses the same Raw Panel API and setup. You can even see this as a separate default config on the config page for your panel.
Positives:
- The option to turn this on/off on the fly with no firmware flash.
Negatives:
- Limited to the whole panel or nothing, so it makes the most sense on small panels.
- Take full control so that no other device cores can be used together with this mode.
- Only DHCP support! No static ip
Blue Pill Inside: Blue pill Inside is something entirely different as this is a Controller that does not have Unisketch, but instead has a SKAARHOJ Blue Pill built it. These controllers can also be used with this module, but they require a bit more setup, and currently, variables are not supported with those Controllers. Other than that, the rest should work just fine, and they have the same flexibility as the normal "Raw Panel" mode mentioned above.
2. Setup Unisketch Raw Panel
Dedicating the whole panel
If you want to dedicate the whole panel for use with Companion, the simple way is to open the "Online Configurator" for your panel and select the "Blue Pill Mode" config. This will give you the same control as the dedicated Blue Pill mode described below, but you can still specify a static IP if you want to.

After selecting this config, set up the IP settings you want and flash the new firmware. And wait for the panel to reboot.
Dedicating only some buttons or if used together with other cores
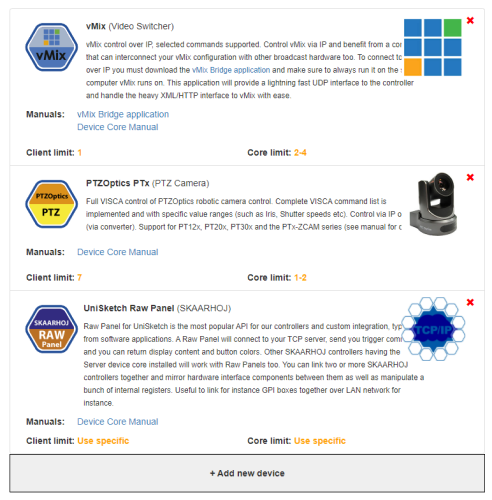
Start by opening the "Online Configurator" and selecting the config you want to use with Companion. Then add the "Raw Panel" device core to the chosen config.
This should look something like this:
After adding the device core, go back to "Controller Configuration" and scroll down to the "Raw Panel" core settings. Please set these settings so they match one of these images, depending on what if you are on what version is presented to you:
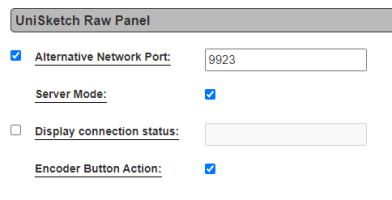
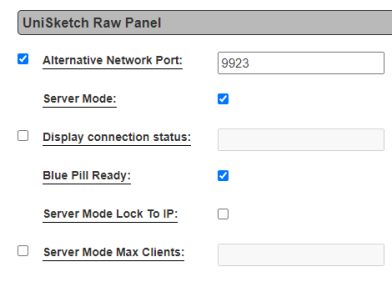
The necessary settings are:
- "Alternative Port" should be ticked and set to "9923"
- Server mode Needs to be ticked
- "Encoder Button Action" or "Blue Pill Ready" should also be ticked
- "Display Connection Status" is not requered and can be left unticked
- "Server Mode Lock To IP" allows you only to allow a connection to the panel from the IP specified in the IP setting for the "UniSketch Raw Panel" core. This can be left unticked
- "Server Mode Max Clients" Can be used to limit the number of devices connected to the panel at once. This can be left untouched
You have now setup the core and if you were to flash this firmware now, Companion should be able to connect to it. But it would not be able to do anything other than system actions with it just yet.
So in order to allow buttons on your panel to be mapped and used inside companion please click on the HWC that you want to control via the webui.
Here you want to add either delete what is already on the HWC and/or add the action: "UniSketch Raw Panel: Tie To Remote HWC" and set the HWC to 0, then it will map the HWC that you have selected, just like this:
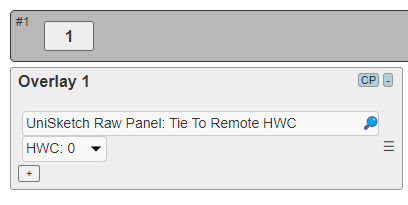
Note that this is also where you will see what the actual HWC ID is if you look at the top left of the picture, you will see that this is HWC 1 because of the naming #1
Repeat this process on all the buttons, encoders, joysticks, LED's, displays and so on that you want to use with Companion.
Last but not least, remember to check that the core is enabled and click "save" after changing these options. You will notice an IP field beside the enable/disable box. This IP field can be safely ignored as it's not used by the panel while using the core in server mode.

3. Setup Unisketch Blue Pill Mode
In order to enable or disable "Blue Pill" mode on a Uniskech controller, follow these steps:
- Reboot the Controller
- While booting, you will see an animation where the lights light up in a "wave" pattern
- During said pattern, press down the button all the way in the bottom left on the panel. (normally also HWC nr 1)
- You should now see a blue "wave" go from the left to the right. This means that it's now in Blue Pill mode.
Here is an example of how to enable Blue Pill mode:
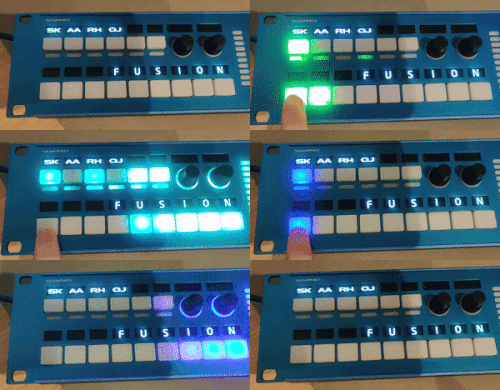
To disable Blue Pill mode again, repeat the process above, and you should now see a white "wave" move across just like the blue one did before.
When a panel is in Blue Pill mode and nothing is connected, it will show its IP and Port that you need to use on one of its displays. If you only see a blank/black controller, this means that it's already connected to either Companion or something else.
Note if this does not work for you, update the controller to the latest version via the firmware updater, you don't need to change anything as this is included in all new firmwares
4. Setup Blue Pill Inside Panel
On a Blue Pill inside panel, go to the panels IP, open the "Packages" tab, and find the package "Hardware-Manager".

Click on the package and you should now see something like this, make sure to use the same settings:
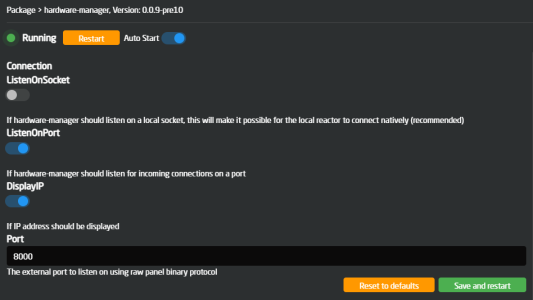
Settings to look for in the "Hardware-Manager" package:
- Make sure you have the "Listen On Socket" unticked
- And that "Listen On Port" is ticked.
- "Display IP" is something you decides, but it can be helpful as it will show the panels IP on one of the buttons if nothing is connected.
- "Port" needs to be set to port "8000", as default it will be set to "9923", so this need's to be changed.
After you have set the settings, click "Save and restart", and go back and open the package "Ibeam-rwp-bridge" and check the settings there against the picture below:
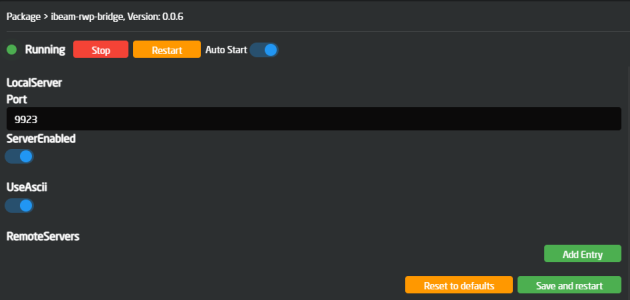
Settings to look for in the "Ibeam-rwp-bridge" package:
- "Port" needs to be set to "9923". This is also the default here.
- "Server enable" should be ticked.
- "Use Ascii" needs to be ticked as well.
Once again, after setting these settings, click "Save and restart" your controller should now be set up and ready to use with Companion.
Other Notes
The word "HWC" is used alot in this document and "HWC" stands for "Hardware Component" on a SKAARHOJ panel, and you will see this ID in the WebUI for your controller. This is the unique identifier that all components have, be it a button, encoder, screen, led and so on.
You can find more info about the "Raw Panel API" and what you can use as a custom command Here or via Direct Download
If you have questions or feel that something is missing in the module, then please create an issue and take a look those already made here on GitHub
SKAARHOJ
To file a new issue, you need to sign up for a user on GitHub.
Go to GitHub issues →